Math/Physics Projects
Measures of Community Project
In the MoC Project, we were required to choose a topic that interests us so that we can eventually survey our team/class members about it. The topic could be about academics, athletics, electronics, independant, family, etc. My topic was Race/Ethnicity. After receiving our data, we separated it into categories to help us make graphs and charts. We learned about the different types of data and how to make an infographic. To finish off the project, We displayed our info graphics to our family and friends at an exhibition.
Observations:
Throughout the process of this project, we were asked to look at our data and make observations. My first observation is that at least 2 students for every race were born in the U.S.A. The second observation is that most students in our team have lived in san diego for their entire life. (on average 14 years)

The Angry Birds Project:
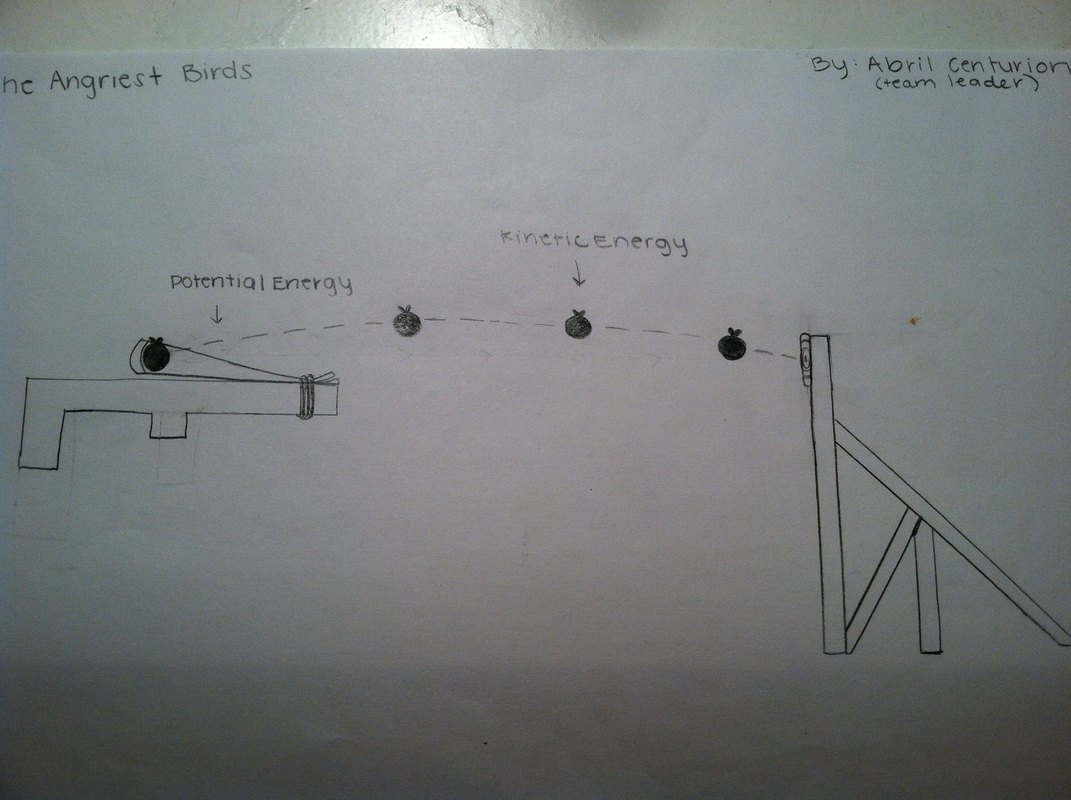
In this project, students in groups of 3-4 were required to create a real life version of each component in "Angry Birds", the mobile game. The components were the Launcher, the Projectile, and the Structure. They were designed using the Engineering Design Process we learned about in class. My role in this project was being chosen as one of the 3 Team Leaders in my class. Each team leader was assigned 2-3 groups in the class to assist throughout the whole project. I was able to experience leadership and step inside the shoes of a teacher. We learned about the five types of forces which are Normal, Friction, Gravitational, Applied and Tension Force. We also learned about Energy and how Potential and Kinetic Energy was displayed in each groups project. Here is a diagram from one of my Groups called "The Angriest Birds" as an example below. What I learned about leading a group throughout this project is that waiting until the last minute can be very stressful in a project and leading a group can seem like their responsibilities are your own. A trick that I learned from this project is that it is important to let your group members know that you are there to help them understand whatever it is they are trying to learn.
In this project, students in groups of 3-4 were required to create a real life version of each component in "Angry Birds", the mobile game. The components were the Launcher, the Projectile, and the Structure. They were designed using the Engineering Design Process we learned about in class. My role in this project was being chosen as one of the 3 Team Leaders in my class. Each team leader was assigned 2-3 groups in the class to assist throughout the whole project. I was able to experience leadership and step inside the shoes of a teacher. We learned about the five types of forces which are Normal, Friction, Gravitational, Applied and Tension Force. We also learned about Energy and how Potential and Kinetic Energy was displayed in each groups project. Here is a diagram from one of my Groups called "The Angriest Birds" as an example below. What I learned about leading a group throughout this project is that waiting until the last minute can be very stressful in a project and leading a group can seem like their responsibilities are your own. A trick that I learned from this project is that it is important to let your group members know that you are there to help them understand whatever it is they are trying to learn.
Into The Wild Project:
In this project, students read the book "Into The Wild" by John Krakauer in humanities and went on a camping trip to Anza Borrego to explore the wild. On the Math/Physics side, students made headlamps, soda can stoves and compasses to bring on the trip. We learned about circuits, how to draw circuit diagrams, measuring the quantity of heat, calculating how much fuel would be needed for our meals, the earth's magnetic fields and how a compass works.
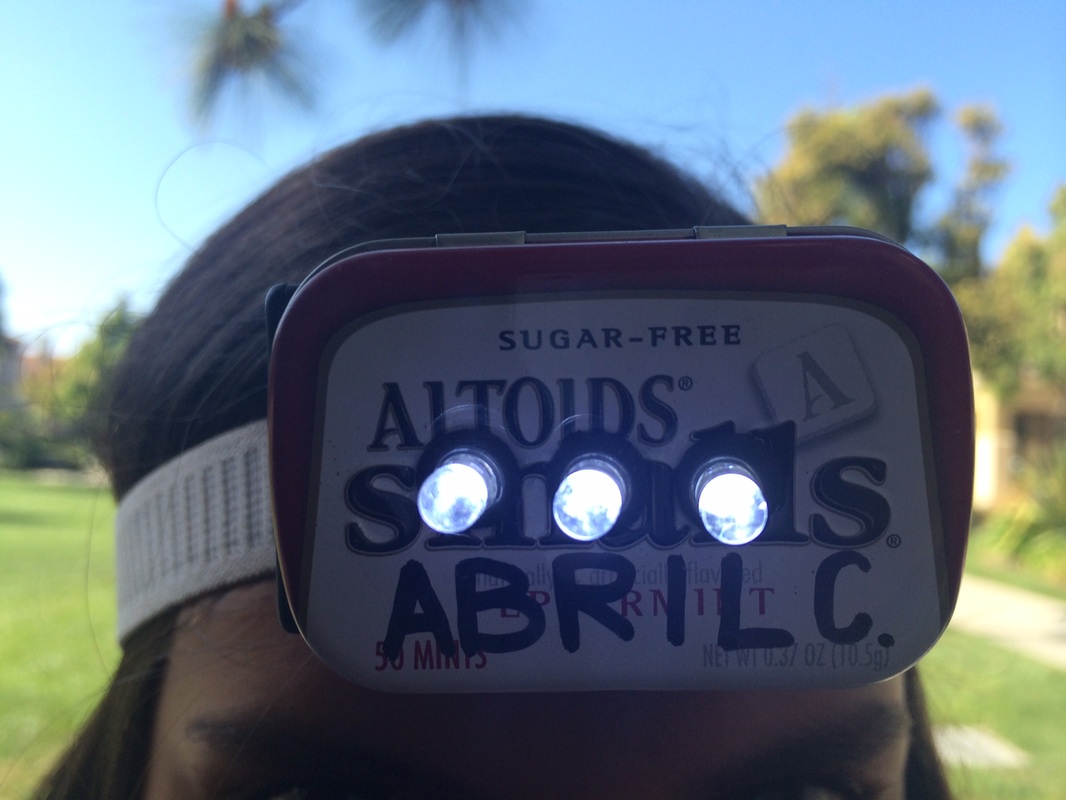
Headlamp:
A headlamp works using an electric circuit. A circuit is like a pathway made of wires that electrons can flow through. A battery/power source gives the voltage(power) that makes the electrons move. When the electrons get to the the LED (light bulb), they give it the power to make it work. A circuit needs to be circular to work. There are two types of electric circuits. Parallel and Series. A series circuit is a circuit that allows electrons to follow one path. A parallel circuit allows electrons to follow more than one path. The headlamp is made using a parallel circuit because the electrons are divided into three different paths. There are 4.5 Volts that are supplied to the circuit because that is how much battery power there is. The voltage is the measure of potential energy. To connect the wires, you have to solder them together making sure not to touch the positive wires with the negative wires. An LED is a light bulb. It is better to use an LED instead of a regular bulb because LED’s provide more light and are able to spread light across wider areas. A resistor is an electrical device that offers resistance to the flow of charge. It is represented by a zigzag line in a drawn circuit. The resistance hinders or reduces the flow of charge. They are necessary because an LED has very little resistance by itself. If you were to run a current (flow of charge) through it directly from a power source, the LED would be destroyed because of too much current.
In this project, students read the book "Into The Wild" by John Krakauer in humanities and went on a camping trip to Anza Borrego to explore the wild. On the Math/Physics side, students made headlamps, soda can stoves and compasses to bring on the trip. We learned about circuits, how to draw circuit diagrams, measuring the quantity of heat, calculating how much fuel would be needed for our meals, the earth's magnetic fields and how a compass works.
Headlamp:
A headlamp works using an electric circuit. A circuit is like a pathway made of wires that electrons can flow through. A battery/power source gives the voltage(power) that makes the electrons move. When the electrons get to the the LED (light bulb), they give it the power to make it work. A circuit needs to be circular to work. There are two types of electric circuits. Parallel and Series. A series circuit is a circuit that allows electrons to follow one path. A parallel circuit allows electrons to follow more than one path. The headlamp is made using a parallel circuit because the electrons are divided into three different paths. There are 4.5 Volts that are supplied to the circuit because that is how much battery power there is. The voltage is the measure of potential energy. To connect the wires, you have to solder them together making sure not to touch the positive wires with the negative wires. An LED is a light bulb. It is better to use an LED instead of a regular bulb because LED’s provide more light and are able to spread light across wider areas. A resistor is an electrical device that offers resistance to the flow of charge. It is represented by a zigzag line in a drawn circuit. The resistance hinders or reduces the flow of charge. They are necessary because an LED has very little resistance by itself. If you were to run a current (flow of charge) through it directly from a power source, the LED would be destroyed because of too much current.
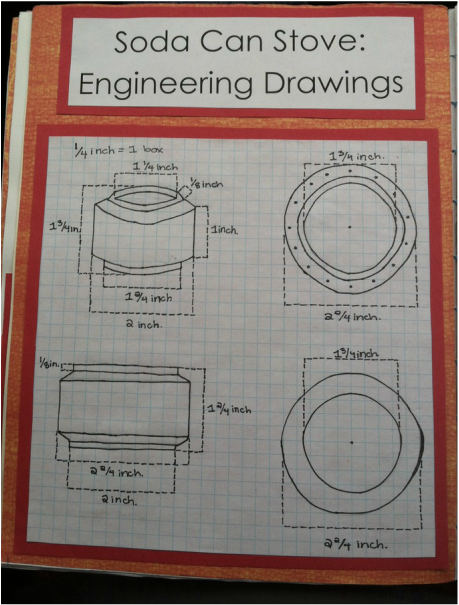
Soda Can Stove:
We used the soda can stoves to cook two of the meals we ate at the camping trip. My group made beef tacos. We knew that cooking raw meat would be difficult and possibly dangerous in the wild, so we decided to bring pre-cooked meat and heat it up with our stoves. Along with the ground beef, we brought shredded cheese and avocados to put inside the tacos. They were delicious! Our group tied as winners with another group for best tasting meal. Our group was so happy!
We used the soda can stoves to cook two of the meals we ate at the camping trip. My group made beef tacos. We knew that cooking raw meat would be difficult and possibly dangerous in the wild, so we decided to bring pre-cooked meat and heat it up with our stoves. Along with the ground beef, we brought shredded cheese and avocados to put inside the tacos. They were delicious! Our group tied as winners with another group for best tasting meal. Our group was so happy!
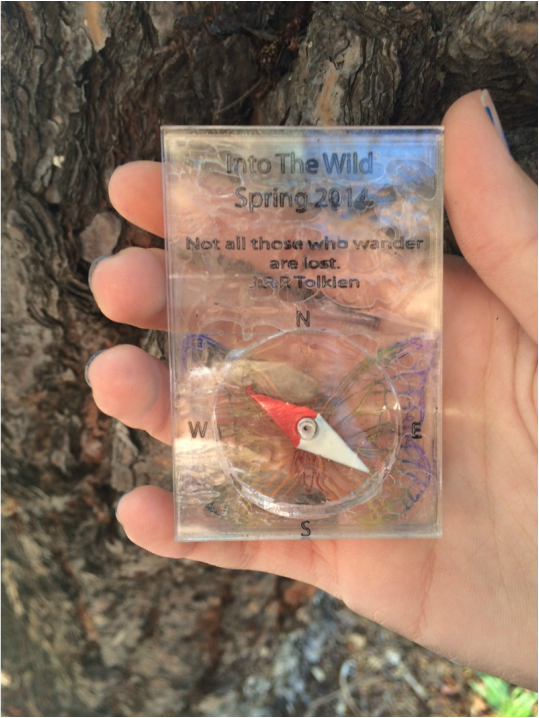
Compass:
A compass is a navigational instrument that shows the four cardinal directions from anywhere in the world. The cardinal directions are North, East, South, and West. A good way to remember them is by remembering the phrase “Never Eat Soggy Waffles.” There are also directions that are in between the cardinal directions. They are called Intermediate directions. (Example: North West.) Inside the compass, there is a magnetic needle that always points to North, which is also referred to as the magnetic north (the direction of the North magnetic pole.) This is because if you think of the Earth’s magnetic field as having a magnet buried in the earth’s core, in order for the north end of the compass to point toward the North Pole, you would have to assume that the buried magnet has its South end at the North Pole. As you can see, the "opposites attract" rule of magnets would cause the north end of the compass needle to point toward the south end of the buried magnet. So the compass points toward the North Pole. A magnet is a piece of iron that attracts other pieces of iron. A magnetic field is the space surrounding a magnetic material or the moving electric charge in which the force of magnetism acts. When a compass is brought close to a magnet, the needle in the compass indicating North will point to the South pole of the magnet. The compass points North because of the Earth’s magnetic poles. The Earth’s South magnetic pole is the geographic North and the Earth’s North magnetic pole is the geographic South. Hence the phrase “Opposites Attract.” If they were to switch places, compasses would switch directions because North is attracted to the South magnetic pole which would cause the magnet to technically point South because that is where the South magnetic pole would be located. To use a compass you must hold it level to the ground. The red part of the compass will always point North because of Earth’s magnetic poles. The Earth’s South magnetic pole is the geographic North. So the red part of the compass will always be attracted to the South magnetic pole.
A compass is a navigational instrument that shows the four cardinal directions from anywhere in the world. The cardinal directions are North, East, South, and West. A good way to remember them is by remembering the phrase “Never Eat Soggy Waffles.” There are also directions that are in between the cardinal directions. They are called Intermediate directions. (Example: North West.) Inside the compass, there is a magnetic needle that always points to North, which is also referred to as the magnetic north (the direction of the North magnetic pole.) This is because if you think of the Earth’s magnetic field as having a magnet buried in the earth’s core, in order for the north end of the compass to point toward the North Pole, you would have to assume that the buried magnet has its South end at the North Pole. As you can see, the "opposites attract" rule of magnets would cause the north end of the compass needle to point toward the south end of the buried magnet. So the compass points toward the North Pole. A magnet is a piece of iron that attracts other pieces of iron. A magnetic field is the space surrounding a magnetic material or the moving electric charge in which the force of magnetism acts. When a compass is brought close to a magnet, the needle in the compass indicating North will point to the South pole of the magnet. The compass points North because of the Earth’s magnetic poles. The Earth’s South magnetic pole is the geographic North and the Earth’s North magnetic pole is the geographic South. Hence the phrase “Opposites Attract.” If they were to switch places, compasses would switch directions because North is attracted to the South magnetic pole which would cause the magnet to technically point South because that is where the South magnetic pole would be located. To use a compass you must hold it level to the ground. The red part of the compass will always point North because of Earth’s magnetic poles. The Earth’s South magnetic pole is the geographic North. So the red part of the compass will always be attracted to the South magnetic pole.
Overall Experience:
My favorite part of the project was going on the camping trip to Anza Borrego because I was able to create a tighter bond with my fellow teammates and explore the wilderness. I also loved making tacos for dinner with our soda can stoves because I am not used to cooking my own meals. The most important lesson I learned in this project was that there are things in life like the simple beauty of nature that can offer so much more than most people think. It releases the stress and expectations of society and allows people to bond while unleashing their inner adventurers.
My favorite part of the project was going on the camping trip to Anza Borrego because I was able to create a tighter bond with my fellow teammates and explore the wilderness. I also loved making tacos for dinner with our soda can stoves because I am not used to cooking my own meals. The most important lesson I learned in this project was that there are things in life like the simple beauty of nature that can offer so much more than most people think. It releases the stress and expectations of society and allows people to bond while unleashing their inner adventurers.
Gazing At The Stars: Telescope Project
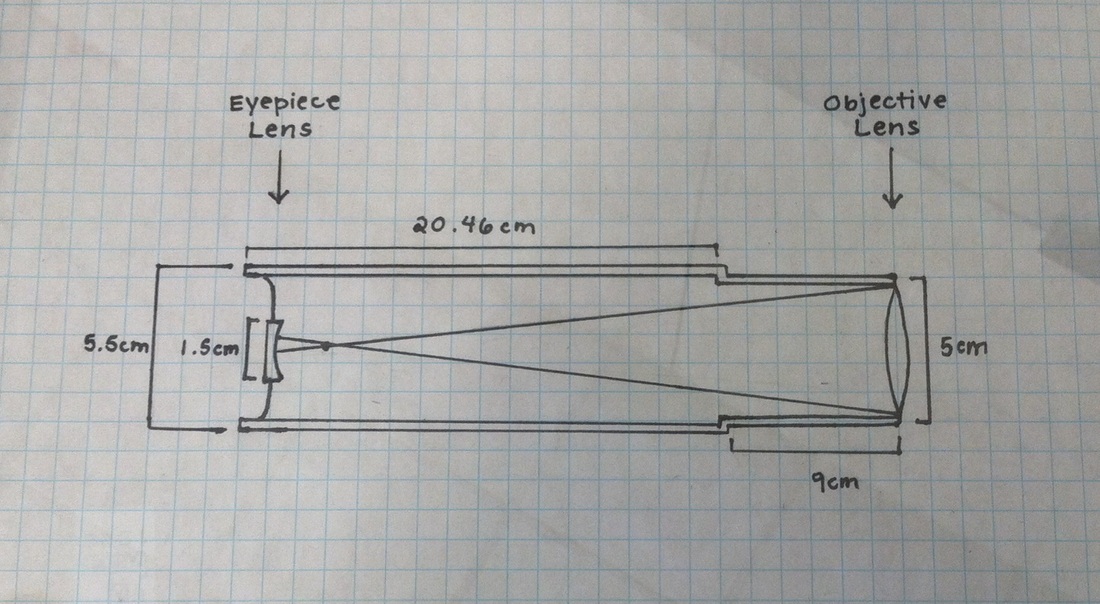
In this project, students were required to build a Galilean, Keplerian or Newtonian telescope in groups of two using lenses provided by Jocelyn. We learned about optics and astronomy. We also experimented with different lenses to find the focal length, chromatic aberration, field of view and magnification. The type of telescope my partner and I built is called the Galilean. It is different from the other telescopes because the image is up right, unlike the Keplerian telescope. The Newtonian telescope's image is also up right, but it's eyepiece is on the side of the telescope. We chose to build the Galilean telescope because we had heard of this telescope before and were curious how it was built because Galileo Galilei used it back in the day. We also wanted our telescope to be small and our image to be up right.
In this project, students were required to build a Galilean, Keplerian or Newtonian telescope in groups of two using lenses provided by Jocelyn. We learned about optics and astronomy. We also experimented with different lenses to find the focal length, chromatic aberration, field of view and magnification. The type of telescope my partner and I built is called the Galilean. It is different from the other telescopes because the image is up right, unlike the Keplerian telescope. The Newtonian telescope's image is also up right, but it's eyepiece is on the side of the telescope. We chose to build the Galilean telescope because we had heard of this telescope before and were curious how it was built because Galileo Galilei used it back in the day. We also wanted our telescope to be small and our image to be up right.
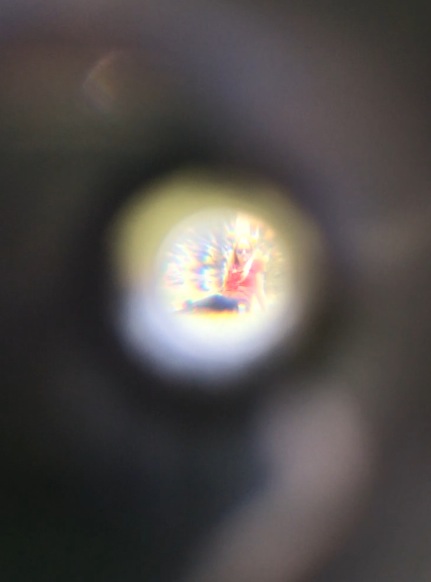
Here is a picture of Jocelyn taken with my Iphone through our Galilean telescope.
Exhibition:
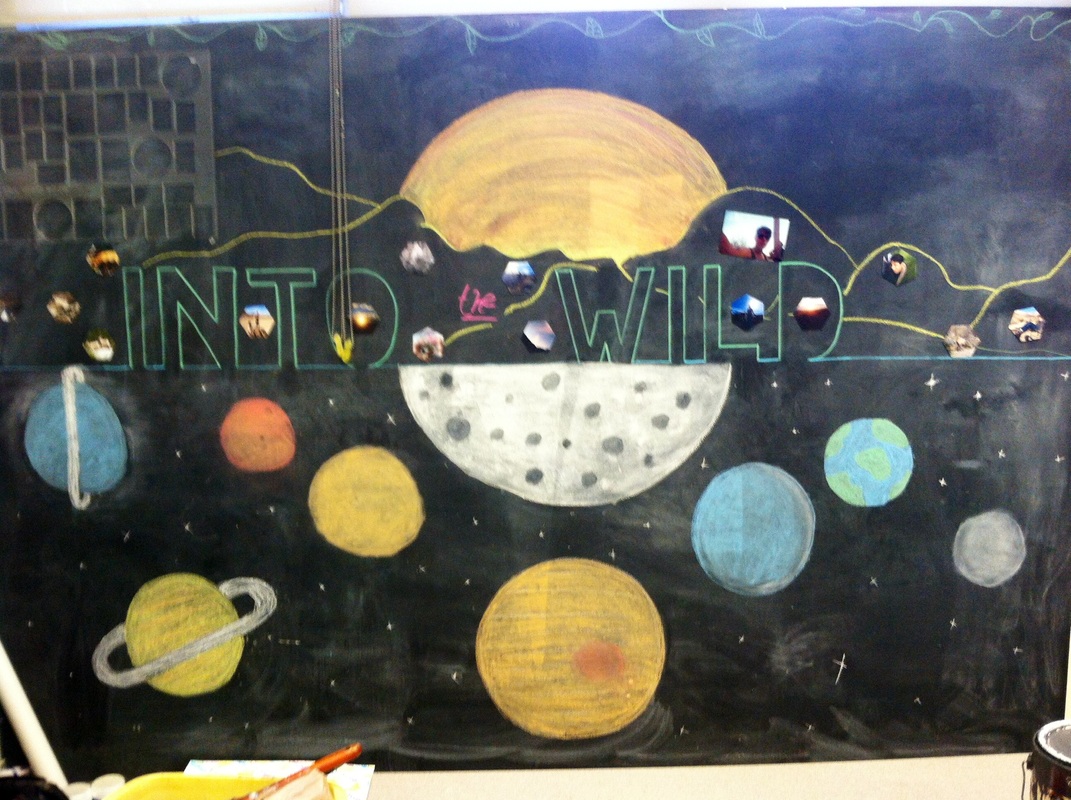
My job to prepare for exhibition was the chalk wall in Jocelyn's room. Since our projects were the Into the Wild project and the Telescope project, we decided to incorporate both in the drawing somehow without making it look sloppy. I think we did a pretty good job because the planets are actually drawn somewhat to scale and the black on the chalk wall really makes the colors pop. Throughout exhibition, I also helped with other jobs such as painting a ton of stars with glow in the dark paint, making space invaders out of cardboard and playing space music to get in the mood. I learned that glow in the dark paint does not always work on the first coat and exhibition may cause stress, but it is definitely worth the hard work in the end.
My job to prepare for exhibition was the chalk wall in Jocelyn's room. Since our projects were the Into the Wild project and the Telescope project, we decided to incorporate both in the drawing somehow without making it look sloppy. I think we did a pretty good job because the planets are actually drawn somewhat to scale and the black on the chalk wall really makes the colors pop. Throughout exhibition, I also helped with other jobs such as painting a ton of stars with glow in the dark paint, making space invaders out of cardboard and playing space music to get in the mood. I learned that glow in the dark paint does not always work on the first coat and exhibition may cause stress, but it is definitely worth the hard work in the end.